March 22, 2023
Writing an Analytics Server using Vapor Part 9 - Filtering in the Client app
In the previous post in this series, I created a way to prepopulate the database with lots of values so that more advanced searches could be tested in the client app. In the previous post, I had given the client app the ability to make those requests.
Now it's time to let the client app send filtered requests that only request certain events, like all events that had their flag set or all events that sent a stop action.
But first, some refactoring
I'm almost ready to start doing these advanced searches, but there is one minor issue. The code to retrieve the data from the server is rather repetitive in EventlistView.swift and PostView.swift. A lot of this is boilerplate, and it's going to get worse as we start to modify the requets with more sophisticated queries.
So it makes sense to refactor the code that retrieves and processes the requests. I create a new swift file called URLSession+Retrieval.swift and I add an extension to URLSession that retrieves an URLRequest, looks for a good status code, and decodes the json response into an expected type. We've all written this kind of code many times, but here's the approach I go with for this simple app:
extension URLSession {

    enum RetrievalError: Error {
        case notHTTPResponse
        case badStatusCode(Int, String)
    }

    private func retrieveData(from request: URLRequest) async throws -> Data {

        let (data, response) = try await data(for: request)
        guard let httpResponse = (response as? HTTPURLResponse) else { throw RetrievalError.notHTTPResponse }
        guard httpResponse.statusCode == 200 else {
            let payload = String(data: data, encoding: .utf8) ?? "no data"
            throw RetrievalError.badStatusCode(httpResponse.statusCode, payload)
        }

        return data
    }

    func retrieve<T: Decodable>(_ request: URLRequest) async throws -> T {

        let data = try await retrieveData(from: request)
        return try JSONDecoder().decode(T.self, from: data)
    }

    func send(_ request: URLRequest) async throws {

        _ = try await retrieveData(from: request)
    }
}

extension URLSession.RetrievalError: LocalizedError {

    var failureReason: String? {
        switch self {
        case .notHTTPResponse: return "The response was not an HTTP Response"
        case .badStatusCode(let statuscode, let data): return "HTTP Response status code: \(statuscode) \(HTTPURLResponse.localizedString(forStatusCode: statuscode)) \(data)"
        }
    }
}
The failureReason var will give me a more descriptive error to the console when something goes wrong while I'm developing.
Now, the code to retrieve the number of user events is much more concise:
    @Sendable private func retrieveEventCount() async {
        do {
            let components = URLComponents.testServer()
                .addingPathComponent("userevents/count")
            let request = URLRequest(components)!

            eventCount = try await URLSession.shared.retrieve(request)
        }
        catch {
            print(error.localizedDescription)
        }
    }
and the other calls are similarly concise.
Writing the UI to Filter the Flag
I'm going to want a view at the top of the EventListView where I can filter the kinds of UserEvents I want to see. I'll start with the flag, since it's the easiest.
I want to be able to either filter by the flag value or not. I may want to see all UserEvents where the flag is true, or all where it's false, or all UserEvents regardless of the flag. How can I present this set of options to the user? I come up with the following design.
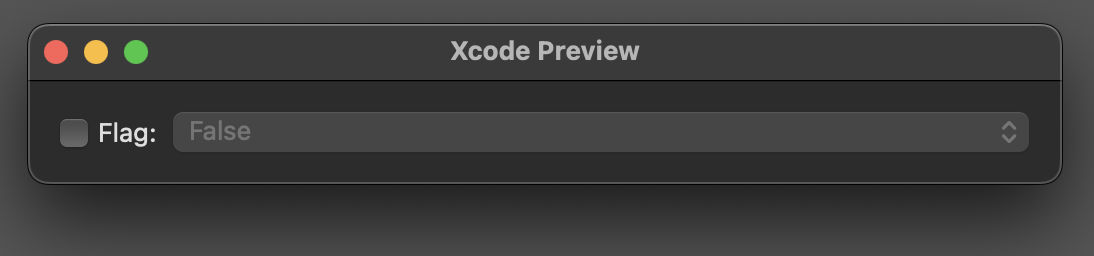

So when the checkbox is not selected, that represents "don't filter by flag", but when it's selected the value selected in the checkbox is used as the filter.
I create a View called FilterByBoolView that will hold the checkbox and the popup. I set it up to take a Binding to an optional Bool.
Unfortunately, there's no direct way to edit an optional Bool using a Toggle in SwiftUI. So I set up a couple custom Bindings.
struct FilterByBoolView: View {
    let title: String
    @Binding var value: Bool?
    @State private var lastValue = false

    private var matchFlag: Binding<Bool> {
        Binding<Bool>(
            get: { value != nil },
            set: { value = ($0 == true) ? lastValue : nil }
        )
    }

    private var flagValue: Binding<Bool> {
        Binding<Bool>(
            get: { value ?? lastValue },
            set: { value = $0; lastValue = $0 }
        )
    }

    var body: some View {
        Group {
            Toggle(isOn: matchFlag) {
                Text("\(title):")
            }

            Picker(selection: flagValue, content: {
                Text("True").tag(true)
                Text("False").tag(false)
            }, label: {
            })
            .disabled(!matchFlag.wrappedValue)
        }
    }
}
matchFlag is true when the user has chosen to filter the flag by checking the checkbox and false otherwise. flagValue represents the value that the user wants to filter by, and is shown in the popup. The popup is disabled if matchFlag is false. The lastValue is used to provide consistency when matchFlag is toggled, or else the value of the popup would switch surprisingly on the user when the checkbox is toggled.
I use a Group instead of an HStack because I want the individual componenets of the View to be layed out by the containing view. Since there will be more than one view in the FilterView, I want them all to line up nicely in a Grid.
struct FilterView: View {

    @State private var flag: Bool?

    var body: some View {
        Grid(alignment: .leading) {
            GridRow {
                FilterByBoolView(title: "Flag", value: $flag)
                    .onChange(of: flag) { newValue in
                        print(String(describing: newValue))
                    }
            }
        }
    }
}
The view to filter by action is very similar, just having to use the rawValue in the popup:
struct FilterByActionView: View {
    @Binding var value: UserEvent.Action?
    @State private var lastValue: UserEvent.Action = .start

    private var matchAction: Binding<Bool> {
        Binding<Bool>(
            get: { value != nil },
            set: { value = ($0 == true) ? lastValue : nil }
        )
    }

    private var flagValue: Binding<String> {
        Binding<String>(
            get: { value?.rawValue ?? lastValue.rawValue },
            set: { value = UserEvent.Action(rawValue: $0); lastValue = UserEvent.Action(rawValue: $0)! }
        )
    }


    var body: some View {
        return Group {

            Toggle(isOn: matchAction) {
                Text("Action:")
            }

            Picker("Action", selection: flagValue, content: {
                ForEach(UserEvent.Action.allCases, id: \.rawValue) { action in
                    Text(action.rawValue)
                }
            })
            .labelsHidden()
            .disabled(!matchAction.wrappedValue)

        }
    }
}
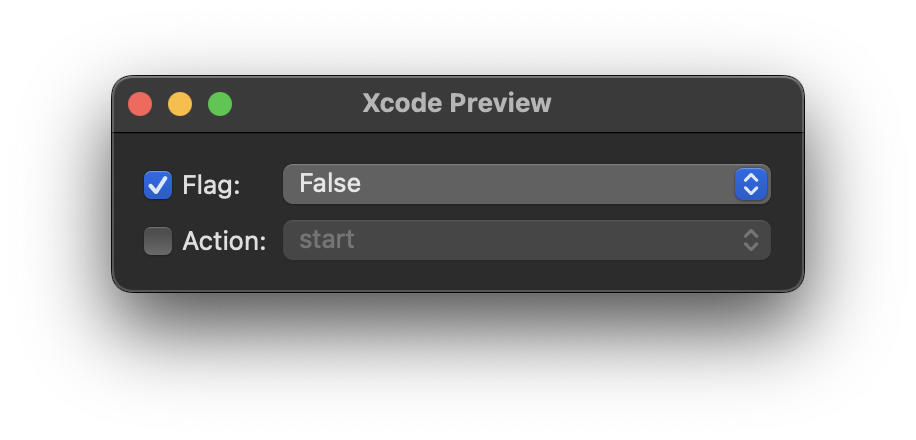
and now the FilterView can show both of these views:
struct FilterView: View {

    @State private var flag: Bool?
    @State private var action: UserEvent.Action?

    var body: some View {
        Grid(alignment: .leading) {
            GridRow {
                FilterByBoolView(title: "Flag", value: $flag)
                    .onChange(of: flag) { newValue in
                        print(String(describing: newValue))
                    }
            }

            GridRow {
                FilterByActionView(value: $action)
                    .onChange(of: action) { newValue in
                        print(String(describing: newValue))
                    }
            }
        }
    }
}
Since the individual views return a Group in their body, the FilterView can properly align the views in each line to make a nice grid.
I then add the FilterView to the top of the EventListView
    var body: some View {
        VStack {
            FilterView()
            List(events, id: \.self) { event in
    ...
This should be all I need to be able to quickly filter my searches. I have a different idea for the UI for the timestamp.
Filtering the Search
Now that I have a filtering UI, it's time to actually filter the search. The server looks for query strings to know how to filter its results, so I need to modify the URLRequest's URL to provide the right values.
I'll write a FilterViewModel type that can both store the user's selection and modify the search. I create a new swift file called FilterViewModel:
struct FilterViewModel {
    var flag: Bool?
    var action: UserEvent.Action?
}
I then modify FilterView to take a FilterViewModel binding:
struct FilterView: View {

    @Binding var viewModel: FilterViewModel
...
and I pass a FilterViewModel to the FilterView in EventListView:
struct EventListView: View {

    ...

    @State private var filterViewModel = FilterViewModel()

    ...

    var body: some View {
        VStack {
            FilterView(viewModel: $filterViewModel)
            List(events, id: \.self) { event in
    ...
After verifying that everything works, I add a method to FilterViewModel to let it modify a URLComponents
    func filter(_ components: URLComponents) -> URLComponents {
        var out = components

        if let flag {
            out = out.addingQueryItem("flag", value: flag)
        }
        if let action {
            out = out.addingQueryItem("action", value: action.rawValue)
        }

        return out
    }
I then modify EventListVIew.retrieveEvents() to use that method:
    @Sendable
    private func retrieveEvents() async {
        do {
            let components = URLComponents.testServer()
                .addingPathComponent("userevents")
            let filtered = filterViewModel.filter(components)

            let request = URLRequest(filtered)!

            ...
I make the same change for retrieveEventCount() and retrieveUserCount().
If I run this now and try to change my filter using the FIlterView, nothing happens because the request is only sent when the view first appears. I need to send a new request whenever the user changes anything in the FilterView.
So I write a new method that makes all three requests:
    @Sendable
    private func reload() async {
        await retrieveEvents()
        await retrieveEventCount()
        await retrieveUserCount()
    }
(I may want to consider making sure that these three requests are made simultaneously, but for now this works for my needs).
I then change the body of EventListView to call this method both when the view first appears and when the filterListViewodel changes:
    var body: some View {
        VStack {
            FilterView(viewModel: $filterViewModel)
            List(events, id: \.self) { event in
                HStack {
                    Image(systemName: event.flag ? "checkmark.circle" : "circle")
                    Text(event.date, style: .date)
                    Text(event.date, style: .time)
                    Text(event.action)
                }
            }
            HStack {
                Text("\(eventCount) events")
                Spacer()
                Text("\(userCount) users")
            }
        }
        .task(reload)
        .task(id: filterViewModel, reload)
    }
And with that, the UI is updated with filtered values whenever I change any of the values in the FilterView.
A Little More Refactoring
The three retrieve methods all do something very similar, and they follow the same logic just with a different endpoint and setting a different property, so it probably makes sense to refactor them.
At the same time, they are no longer being put in a .task() modifier, so they don't need to be @Sendable anymore
    private func request(for endpoint: String) -> URLRequest {
        let components = URLComponents.testServer()
            .addingPathComponent(endpoint)
        let filtered = filterViewModel.filter(components)
        return URLRequest(filtered)!
    }

    private func retrieveUserCount() async {
        do {
            let request = request(for: "users/count")
            userCount = try await URLSession.shared.retrieve(request)
        }
        catch {
            print("Error retrieving \(request)")
            print(error.localizedDescription)
        }
    }
    ...
Summary
Now my client can send filtered results based on the user's needs. The next big step is to take advantage of the timestamp to sort the events by day week or month.
Posts in this Series:
- Part 1: Intro
- Part 2: Setting up the Development Environment
- Part 3: Setting up UserEvent
- Part 4: Dynamic Output
- Part 5: The Database
- Part 6: Retrieving Info About Users
- Part 7: Writing a Client
- Part 8: Prepopulating the Database
- Part 9: Filtering Requests
- server project on github
- client app on github